Keep Your Back Healthy & Pain-Free
As someone who has personally dealt with back pain, I can appreciate how important it is that my hips stay strong to maintain a healthy back. By having good strength in the hips, some of the extra work and strain can be taken out of the back and can even help decrease the workload on the knees too! These muscles are some of the largest and/or thickest in the body, but we don’t always utilize them in the most efficient ways.
Let’s learn a little bit more about the gluteus maximus, the largest muscle in the back, or posterior section, of the hip. And, of course, we’ll give you a few ways to work this muscle to keep your back healthy.
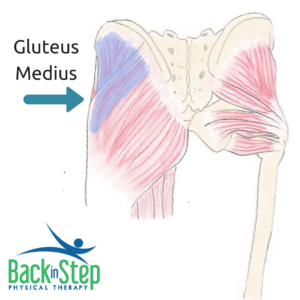
The Anatomy & Function
The gluteus maximus (glute max) sits at the back of the hip and pelvis. It is the true powerhouse of our lower bodies. It originates from the gluteal surface of the ilium, lumbar fascia, sacrum, and sacrotuberous ligament. The glute max then inserts on the gluteal tuberosity of the femur and iliotibial tract. It gets its nerve supply from the inferior gluteal nerve (L5, S1, S2).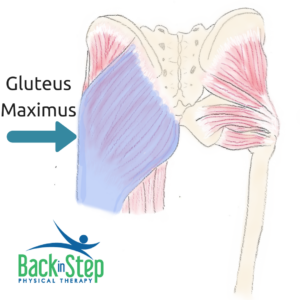
The glute max helps with external rotation and extension (turning your foot outward and moving your leg behind you) of the leg. Because of its connections and location also helps in keeping your torso upward (like coming back up from bending forwards) and can help with abducting the leg (moving the leg to the side).
If you’ve ever dealt with hip, knee, or low back pain, or even feeling like your hamstrings are tight, you may actually need to do some work on the gluteus maximus. Let’s keep your back healthy!
This muscle is important for a wide variety of activities, including:
- getting up & down from a chair,
- going up & down stairs,
- walking or running up/down hills, or navigating more challenging terrain,
- power for squats, jumps, and leaps,
- and more.
What to Do About It
There are a lot of different ways to work the glute max. We’ll talk about a few options, including some squat variations, hip thrusters, and donkey kicks. We’ll also show you how to stretch the glutes, since tightness here affects the back, just like weakness can cause problems.
The Basics
There are a couple of things that we need to consider any time that we are working on the glutes.
First of all, while working the glutes, it can be tempting to let our back do some of the work, which it isn’t necessarily meant to do. One way to combat that is to keep your core engaged. We like to think about gently pulling your bellybutton towards your spine, without flattening your back. It should feel like when you’re trying to fasten that top button of a pair or jeans. 😊
Secondly, our hamstrings also like to help the glute max in doing its job. As you’re working to strengthen the glutes, make sure that you’re feeling more of the effort in the buttocks or back of the hip, not in the hamstrings in the back of the thigh. You can imagine gently squeezing the glutes as you work. Another option is to bend the knee, giving less advantage to the hamstrings.
Squats
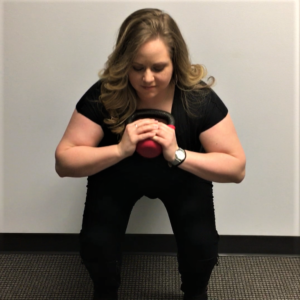
There are MANY variations of squats. Here we have a standard squat pictured, using a weight in the hands as a counter-balance. By doing this, it allows you to get your hips further back by counter-acting your body weight. Notice that knees are staying aligned with the toes and feet are pointed straight ahead. Core is engaged and we are squeezing the glutes on the way up and down.
You can do these with a wider stance, single leg, standing on an unsteady surface (BOSU is our favorite), and more.
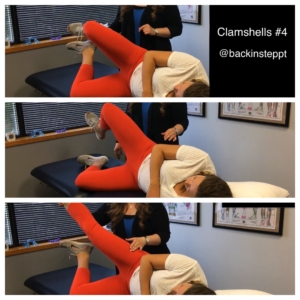
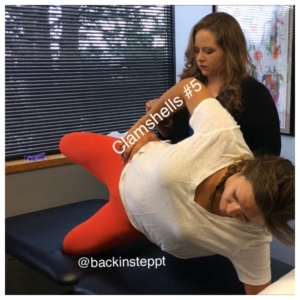
Hip Thrusters
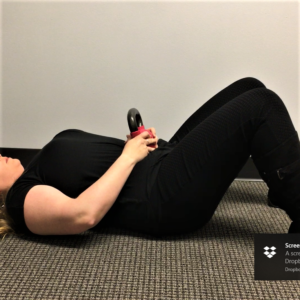
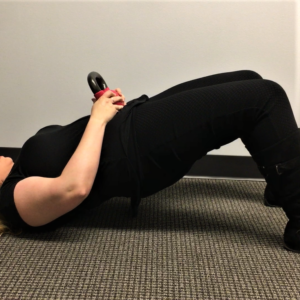
- Start by lying on your back, knees bent, and feet flat on the floor.
- Keeping core engaged and glutes activated, push your hips up towards the ceiling.
- The goal is to make it a smooth, fluid motion, not jerky.
- Slowly lower yourself back down to your starting position.
We’ve added a little resistance by holding a weight over the pelvis. You can use a kettlebell like we did, a free weight, a barbell, or even use a resistance band. Another option to engage core even more – keep your upper back and shoulders on an exercise bench with feet on the floor. It will allow for a larger range of motion to work the glutes.
Donkey Kicks
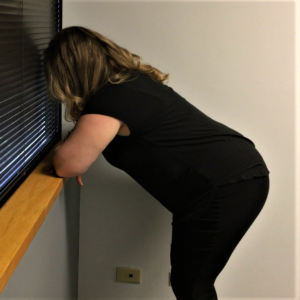
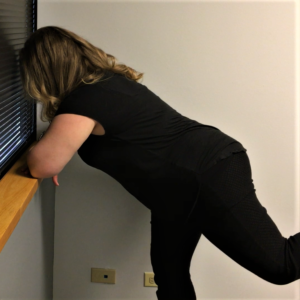
Standing Kicks:
This is good if you have more back pain, have difficulty maintaining the hands and knees position, or can only work in a limited range of motion at the hip. This is also a good starting spot if you are new to this sort of exercise.
- Stand about 1-2 feet away from a table, counter, or other sturdy piece of furniture that is at least waist height.
- Lean forward to get your upper body supported on the surface, whether it’s bend elbows as picture or on your hands with straight arms.
- Engage your core.
- Extend one leg behind you while maintaining a neutral spine. Feel as though your heel is driving your leg backwards or like you’re even extending through your heel.
- Slowly lower back down to your starting position.
You can start with a straight leg, which will get both glute max and hamstrings to help with the motion. As it gets easier, work towards doing this with a bent knee, which starts to focus in on the glute max even more.
Make sure that you don’t let your back arch or pelvis twist as you do this!
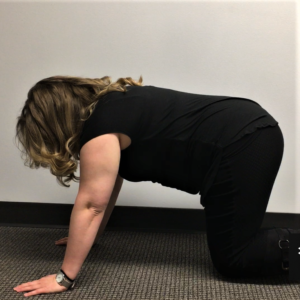
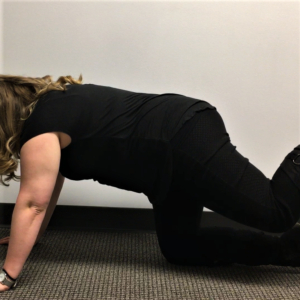
Quadruped Kicks:
- Start on hands and knees. Your shoulders should be over your hands and your hips should be over your knees.
- Engage your core, keeping your spine straight.
- Extend one leg behind you while maintaining a neutral spine. Feel as though your heel is driving your leg backwards or like you’re even extending through your heel.
- Slowly lower back down to your starting position.
You can start with a straight leg, which will get both glute max and hamstrings to help with the motion. As it gets easier, work towards doing this with a bent knee, which starts to focus in on the glute max even more.
Again, make sure that you don’t let your back arch or pelvis twist as you do this!
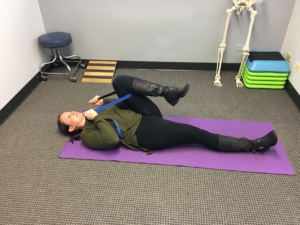
Glute Stretch
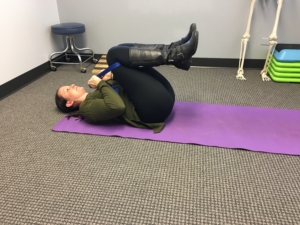
Tightness in the low back and glutes can also contribute to low back pain, so here’s a way to combat that. We like to use the stretch strap or a belt to help hold the legs in place, so it doesn’t feel like you’re straining your upper body in order to stretch the lower body!
- Lie on your back on the floor.
- Bring one knee up towards your chest and then the other. By moving both at the same time, you may place more stress on your back, especially if you’re already having low back pain.
- Bring your knees towards your chest until you feel a gentle stretch in the low back or buttock.
- Hold for a total of 1-2 minutes.
- To come back out of this position, again move one leg at a time.
Give these exercises a try and let us know how they work for you. Here’s to a healthy back!
Want more exercise ideas? Check out our other blogs and our YouTube channel!
DISCLAIMER: The purpose of this site is to promote understanding of health, wellness, and prevention. The information on this site is not intended/implied to be a substitute for professional medical advice, diagnosis, or treatment. If you are experiencing pain, please see a medical professional.