Strong Hips are Crucial!
There are many important muscles and other structures to consider in the hips, and it’s important to have strong hips. One that is often neglected or underused is called the gluteus medius.
The Anatomy & Function
This muscle sits at the back of the hip and pelvis, underneath the gluteus maximus. It originates from the gluteal surface of the ilium and inserts onto the greater trochanter of the femur, and gets its nerve supply from the superior gluteal nerve (L4, L5, S1).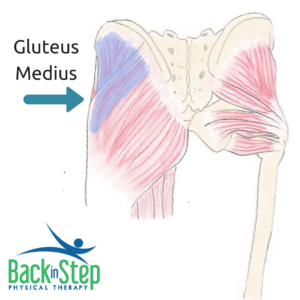
The gluteus medius helps in abduction, or moving your leg to the side. It also has a small part in flexion and internal rotation (moving the leg in front of your and turning the leg in) with its anterior fibers, and extension and external rotation (moving the leg behind you and turning the leg out) with its posterior fibers.
When the gluteus medius is working appropriately, it helps to keep your pelvis level when standing on one leg. This also means that it helps with maintaining balance. Lastly, when this muscle is strong, it helps maintain an even workload through your back, hips, and knees. It’s an important player with take off and landing for jumps and leaps. So you can imagine why this is such an important muscle!
What to Do About It
There are MANY ways to work on strengthening and improving the performance of the gluteus medius. Ideally, we get to a point where it’s being worked in a variety of positions and through different movements.
Today, though, we are just talking about a simple place to start. We’ll be working through five different levels of an exercise called Clamshells. Our examples are without any additional resistance added, like a resistance band or ankle weights. To see these exercises in action with a full walk-through, check out our YouTube video here.
Otherwise, keep reading to learn the progression!
The Basics
The starting position is the same for all levels. Start in side-lying with hips stacked on top of one another, knees bent, and fee stacked. Your hips should be bent to about 45* and knees at about 90*.
Some important things to remember:
- Keep your pelvis stable with abdominal muscles engaged.
- Minimize the use of your hands for balance.
- Slow and controlled motion is key.
Level 1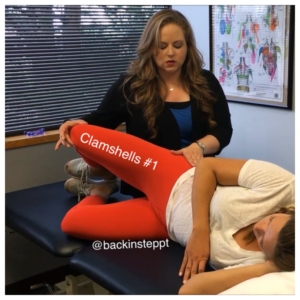
- Feet remain stacked and touching.
- Top knee lifts towards the ceiling, moving into external rotation.
- Hold for 5-10 seconds.
- Slowly lower back down to starting position.
Level 2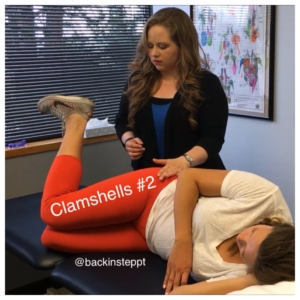
- Knees & thighs remain stacked and touching.
- Top foot lifts towards the ceiling, moving the hip into internal rotation.
- Hold for 5-10 seconds.
- Slowly lower back down to starting position.
Level 3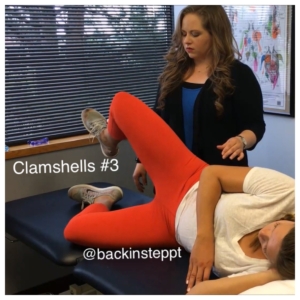
- Hips remain stacked, without rolling or tipping.
- Entire leg stays in slightly bent position, and lifts towards the ceiling, only lifting as high as possible without the spine collapsing towards the floor.
- Hold for 5-10 seconds.
- Slowly lower back down to starting position.
Level 4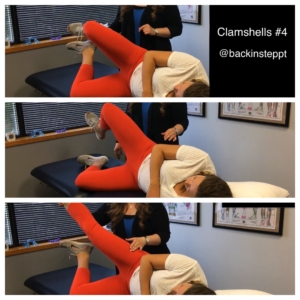
- Hips remained stacked, with bellybutton just slightly rolled towards the floor.
- Bottom knee stays on the floor, and feet lift off of the floor.
- From this new starting position, lift the top knee up off of the other leg, while maintaining contact at the feet.
- The top leg then extends to a straight leg, while maintaining the rest of the position.
- Hold for 5-10 seconds.
- Slowly bend knee and reconnect at the feet, then lower back down to starting position.
Level 5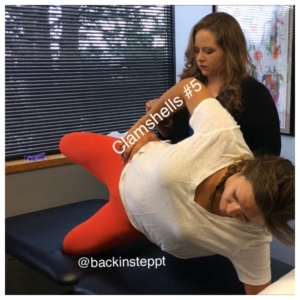
- Position yourself into a side plank, hips without any bend (straight line at hips), knees bent to 90*.
- While maintaining the side plank position and keeping feet stacked, lift top knee towards ceiling.
- Hold for 5-10 seconds.
- Return to side plank position.
Try these exercises out to create strong hips for yourself. Let us know if you have any questions!
DISCLAIMER: The purpose of this site is to promote understanding of health, wellness, and prevention. The information on this site is not intended/implied to be a substitute for professional medical advice, diagnosis, or treatment. If you are experiencing pain, please see a medical professional.
